Everyware: Research & Social impact

Almost a quarter of the world’s population are on Facebook (Gaitho, 2017) Whilst it may be argued that social media websites like Facebook encourages social interaction, the opposite is actually true.

Research shows that social media is actually making us less social. people who use 3 or more social media platforms will, on average, only socialise once a month. (Adams, 2017)

Social media use also shapes our personality. Before the age of Facebook, if you moved away from friends or family, you would simply move on and keep contact via email or letter, a slow process. Because of this, you would be more encouraged to meet new people within the area and expand your social circle. Facebook changes this by making users keep contact with old friends or family, inhibiting social growth. (della Cava, 2014)

Social impact

The Icebreaker T-shirt will encourage users to step away from their mobile devices and interact with new people. Users will input their data into the app & go, taking their attention away from their phone and into the conversation.

The Tshirt will also encourage users to expand their social circle, breaking away the chains of social media and allowing them to grow and move on.


References

Adams, S. (2017). Fears social media could actually be making people unsociable. [online] mirror. Available at: https://www.mirror.co.uk/tech/social-media-making-you-unsociable-10490787 [Accessed 19 Dec. 2017].

della Cava, M. (2014). How Facebook changed our lives. [online] USA TODAY. Available at: https://www.usatoday.com/story/tech/2014/02/02/facebook-turns-10-cultural-impact/5063979/ [Accessed 19 Dec. 2017].

Gaitho, M. (2017). What is the real impact of social media?. [online] Simplilearn.com. Available at: https://www.simplilearn.com/real-impact-social-media-article [Accessed 19 Dec. 2017].

Netscapes: Building – MongoDB & Python

This week I have focused on the building stage. After helping my team members get started with p5.js, I got to work building my parts of the project: the back-end and LED control.


Emotion/colour Sliders – Python & Arduino LED control

Part of our project includes the representation of emotions in a visual sense. We decided on creating this using a basic slider input, so I got to work developing it.

I built this using:

  • Raspberry Pi 3
  • Arduino
  • 5″ GPIO touchscreen
  • Python

I created my app using libraries including PySerial (for serial connections using Python) and tkinter (For rapid production of basic user interfaces). I decided to use Python as I have previous experience with creating connections to Arduino using PySerial.

Building circuits

Firstly, I setup the Raspberry Pi 3 with the necessary drivers & fitted the touchscreen. I created a script on the desktop to open an on-screen keyboard (so I wouldn’t have to use a keyboard for setup later). I then built a basic circuit with an RGB LED and hooked it up to the Raspberry Pi.

IMG_20171208_003440 (1)

My Rasberry Pi with GPIO touchscreen.

Programming

I started off by building a basic slider interface using tkinter and Python. I made sure it was appropriately scaled to the screen and then worked out how to get the output of the slider in real time. In this case, I used 1 to 8 to match our data input app.

IMG_20171210_195700

Basic RGB LED wiring

Once the slider was working correctly, I set up a basic serial connection to the arduino using PySerial. Since PySerial needs data to be sent in bytes, I had to make sure the characters sent were encoded. I then built a basic script on the Arduino side to receive the characters and change the colour of the RGB LED based on how far the slider was moved (in this case blue to yellow for sad to happy).

Link to my code on GitHub: https://github.com/Mustang601/Arduino-Serial-LED-slider 

Sequence 01_1

My completed LED slider

My next steps are to further develop the user interface, and to figure out how to use this in conjunction with the other user inputs (for database connection).


MongoDB

I created a database in MongoDB, and hosted it on mLabs (due to a software conflict I couldn’t easily host it on my own server, so this was the next best thing!)

The database will hold all the input data from our app; and will be used in the creation of our visualization.

mongo input document

Document within MongoDB database

The next step is to connect this database up to the input app and visualization once they are both completed.


Related Links

tkinter: https://docs.python.org/3.0/library/tkinter.html 

PySerial: https://pythonhosted.org/pyserial/

mLabs: https://mlab.com/

MongoDB: https://www.mongodb.com/

Everyware: Icebreaker development – LEDs & MQTT

In this post I will briefly outline my part in the creation of our wearable technology: The Icebreaker T-Shirt.

My responsibilities included creating the physical prototypes: Using the NodeMCU and MQTT connections to build a wearable system.

Prototyping: Single RGB LED

I started off by prototyping MQTT connections with a single RGB LED. I built a basic circuit and programmed it so that it would connect to the MQTT broker, and light up when data is received.

This was a very basic prototype to test MQTT connections and reactions, to see what is possible across MQTT communications and how messages are both sent and received.

During this time, I ran into many internet connectivity issues with the NodeMCU board – Whilst it does work, it often needs resetting as the connection is prone to drop out after running for a while. This is a known limitation of the board and a workaround should  be found for the finished product.

IMG_20171125_192722

NodeMCU wired up to the RGB LED for testing messages sent across the MQTT i-dat broker.

RGBW LED Strips

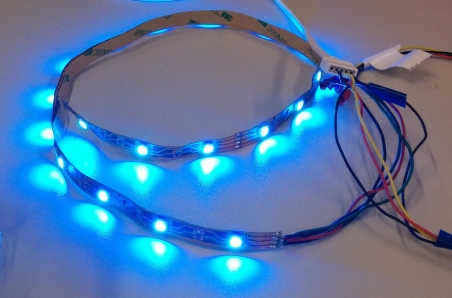
After this, we experimented with using RGBW LED strips. I wired up a circuit (using transistors to prevent burning out my controller board) and experimented with some code to create patterns and colour combinations.

img_20171121_105614.jpg

Testing the RGB LED strip

In addition to issues with powering these strips from the NodeMCU board without external power sources, it was apparent these strips were not composed of individually addressable LEDs, so turned out to not be appropriate for our usage. It would also be difficult to fit these LED strips around a T-shirt design without cutting them in multiple places and soldering many wires to bridge the gaps, resulting in a messy and impractical finish.

img_20171121_122214.jpg

Wiring up the RGBW LED strip with multiple transistors – one for each colour & white.


24 RGB LED Ring

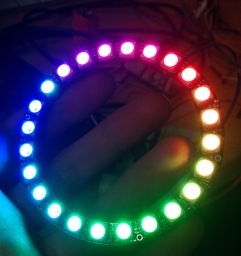
Next we moved onto using an Adafruit Neopixel 24 LED ring. First, I soldered some header pins into the ring for easy wiring. Later these could be removed and either directly soldered onto, or even potentially be connected to using conductive thread.

IMG_20171201_112748

24 LED ring with sample code.

I worked out how to individually address each LED to both change the colour and brightness, and then used the code from the first single RGB LED (shown above) to connect it to the MQTT broker.

After this, I setup basic reactions to each input to simulate what will happen once the database is properly connected; such as changing the colours when a match is detected.

Basic lighting effects/reactions i initially created include:

  • Ambient (No match/resting)
  • Match (Different colours for different matches) – Currently 3 max
  • Left – Left side lights up
  • Right – Right side lights up
img_20171210_210009.jpg

Wiring up my NodeMCU board to the LED ring. The circuit requires the use of capacitors to prevent damage to the LED ring and resistors on the data inputs. (Tape shown over LEDs is for diffusing)

The next steps are to create more visually appealing lighting effects & reactions (which I will work on over the next week) and to hook it up to the database via MQTT, which is being handled by my other team members.


Links

Adafruit Neopixel/Library: https://learn.adafruit.com/adafruit-neopixel-uberguide?view=all


Netscapes: Creation and Coding

Now we are moving into the development stage of our project, I have started setting up the server-side technologies we are planning to use. Here is an overview of the resources we plan on using plus an update of  my work so far.


Resources we are using

Here are the hardware and software resources we are using for our project:

  • MongoDB – in conjuction with PDO/PHP – for database operations
  • P5.js (with HTML/CSS/js .etc) – for visualizations
  • GitHub – for easy collaboration and version control
  • My server/website – for hosting .etc
  • Raspberry Pi & Touch input – for user input
  • Projector & Projection mapping software – such as surface mapper GUI

Setting up the Server/Database

I installed MongoDB to my server ready for us to use.I designed how it would work in relation to the data we will store and how we will store it. The database and other parts of the project will be hosted here.

Database Design

earlyflow

Sketch of Database connection flow in relation to Raspberry Pi and IVT visualization

netscapes_diagram
A flowchart I created to outline how our project will operate in relation to the server/Database.

Functional & Non-functional requirements:

Functional:

  • Input of user data from input page/app
  • Storage and retrieval of data for use in visualization

Non-Functional:

  • Security of database – PDO (PHP data objects) is used as it uses prepared statements, which makes it more secure against injection attacks. (Stackoverflow.com, 2017)
  • Security of server – a separate username and password are used for database access only, hidden from viewing by site visitors.

Sample Content of Database

Below is an outline of how our database will work, where “options” relates to the sliders within the app.

db structure

MongoDB Document structure, created by Chris (https://enoodl.com)

Primary Key Name Option 1 Option 2 Option 3 Option 4
1 John Doe 1 6 5 3
2 Jane Doe 8 9 6 7
3 Jill Doe 4 2 8 4


After designing I created a database with necessary tables ready to store the data once the app becomes live.

Since MongoDB works with PDO, I chose to use this for our project as I have experience working with it in the past. This is beneficial for added security against injection attacks and flexibility in case of moving to another database. (Stackoverflow.com, 2017)


GitHub

We are using GitHub for easy collaboration and version control. Since a lot of my work is on the server side, not much will be seen on GitHub other than adding my contributions (such as server connections) to my other group member’s code.

My GitHub can be found here: https://github.com/Mustang601/


Links

My GitHub: https://github.com/Mustang601 
My Website: http://mustangphoto.co.uk/
MongoDB: https://www.mongodb.com/
P5.js: https://p5js.org/
PDO: http://php.net/manual/en/book.pdo.php
SurfaceMapperGUI: http://jason-webb.info/2013/11/surfacemappergui-a-simple-processing-interface-for-projection-mapping/


Sources

Stackoverflow.com. (2017). In PHP, how does PDO protect from SQL injections? How do prepared statements work?. [online] Available at: https://stackoverflow.com/questions/4042843/in-php-how-does-pdo-protect-from-sql-injections-how-do-prepared-statements-wor [Accessed 3 Dec. 2017].