Developing Creative AI: The Making of Aida
In this post I outline, from start to finish, the entire process of creating Aida, from early experiments, to formulation of ideas, to the final steps, taking into account all the changes made along the way and why they were made.
Early Development
To get started, I first began installing all the necessary dependencies and packages needed to work with AI. In this case, I am using Tensorflow and python. To enable Tensorflow to use the GPU (to speed up the learning process dramatically) I also had to install NVidia CUDA and CuDNN. During the training process, I use Tensorboard to keep track of the progression of training. Since I am using Windows instead of Linux, which most AI examples are built for, I am also using Cygwin; a unix-style command line interface that allows the use of Linux commands on Windows. These are just the basics; on top of this, there is a long list of extra packages that are needed, depending on what is being worked on.
My first experiment into using AI was using GANs (Generative Adversarial Networks) to demonstrate image to image translations. GANs learn by having two sides of a network, a Generator and a Discriminator, compete to both improve their methods (To see a full explanation, see my post on Aida here)
To start, I downloaded CycleGAN Horse2Zebra, both as a test to ensure all dependencies were installed correctly, but also to determine what level of results I would get from using this kind of system. I downloaded the sample dataset and, after a little tweaking, the first images start to appear!
CycleGAN Horse2Zebra works both ways: It learns to turn horses to zebras and vice versa simultaneously. Below are some examples of images it outputted during the training process:

Image produced in the first cycle of ‘Horse2Zebra’
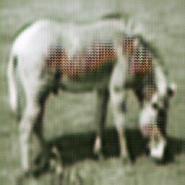
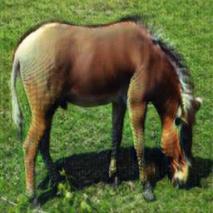
Image produced in the first cycle of ‘Zebra2Horse’
Typically, these first images are blurry and somewhat nonsensical, but they do offer insight into what the neural network is ‘latching onto’; such as picking out stripes from the zebra or the horse from the background.
As training progresses, the network slowly improves and this is shown through the outputted images.
72nd Cycle of ‘Zebra2Horse’

72nd Cycle of ‘Horse2Zebra’
I ran this network for 200 epochs (cycles through the training data), taking roughly a solid week of training. These are some of the final results with the input image side-by-side:

Horse to Zebra

Zebra to Horse
Edges to Objects
Next, I had a go working with other forms of GANs, in this case ‘Lines to Handbags’ and Lines to Shoes’ using pix2pix. This works on the same concept (and similar code) of Horse2Zebra/Zebra2Horse, except it doesn’t learn to “work backwards” – simply because it doesn’t need to. This has the added benefit of speeding up the training process (although in this case not, because the dataset is much much larger than Horse2Zebra).
Due to the amount of time taken to train these models, I stopped training before it completed. Below are some examples of output images:

An early shoe created by ‘edges to shoes’

The first bag created by ‘lines to bags.’
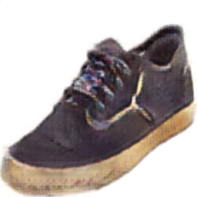
A later shoe output
During this process, I also came across my first ‘failed’ GAN.

Image produced by the failed GAN.
This failure was most likely caused by Generator loss – in this case the only thing that can be done is to stop it and try again.
After this, I ran into my second failed GAN, where a single wrongly formatted image within the handbags dataset (out of a total 138,000) caused the whole system to crash.
Early Idea Generation
Very early on in the project, I had the idea of creating something with a philosophical meaning for viewers to reflect on. Some of my earliest ideas were working with the concept of “Impermanence”, or the idea that all of existence is transient and inconstant, and somehow reflecting this through the use of Artificial Intelligence.
After working with Edges to Bags/Shoes, I had the idea to work with translations with lines to coloured/textured images. I liked the idea of ‘producing something from nothing’, and using the GAN-created images for something. After looking at pieces such as Codex Seraphinianus for inspiration, I liked the idea of creating strange creatures. I also liked the idea of having some level of interactivity for viewers during the exhibition.
I got the idea of creating a tool for users to create line drawing of fish, which would then be sent to a GAN to texture, then brought to life in a virtual fish tank, possibly by using projection. I decided to use fish because the images and textures produced by GANs can look ‘off’ or misshapen. Since fish often have bright colours and unusual shapes (and there are many yet to be discovered), they are much less likely to look ‘off’ as opposed to animals like zebras. The bright colours and mix of textures also make them look visually appealing.
This also ties in with Impermanence, that viewers can, in a sense, ‘leave their mark’ on the piece, in the world created by the AI. To further this idea, none of the fish would last for a long period of time; perhaps being replaced after a certain number were in the tank or simply disappearing after a certain amount of time.
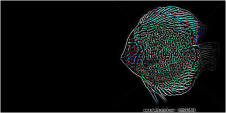
As time went on, I realised that this would be too much work – there are a lot of variables within the system and a lot of places where errors could occur. Not only could animating these fish in real-time be difficult with so many variations to take into account, there could also be issues with user inputted drawings. Since ‘Bad’ lines can lead to ‘Bad’ outputs, there could be a lot of ‘fish’ in the tank that look something like this:

A failed output due to ‘bad’ lines
Having a tank containing only fish that look like that would be completely unacceptable – ruining the experience of the installation for viewers. Even the best trained GAN would still run into issues like this with user-inputted lines – it is unavoidable. To combat this I decided to instead lose this form of user interaction and instead take a different path (but stay with the fish idea for reasons stated earlier).
I decided on making an exhibition of GAN-created “paintings” of sea creatures, with an option for viewers to have a go at collaborating with the system. This allowed me to keep the interactive aspect of the system and show of its capabilities, but not in such a way that a failure would be catastrophic for the entire installation.
This idea ties in with challenging public perceptions of machine created artworks, and making observers question the creation of art – Is it a uniquely human trait, or are we not as unique and creative as we really think we are?
Automated Dataset Creation & Training
Generally, datasets for GANs consist of thousands of images. Since datasets require a large amount of correctly formatted images, it would be impossible to create this by hand.
To make my edges-to-fish training dataset, I first used Python package ‘Google-images-download’. This enables the scraping of a large number of images from Google with certain keywords and preferences. In my case, I used this tool to scrape thousands of images of colourful fish from google, all with white backgrounds.
At this point, a little intervention is needed, as the images that are downloaded aren’t always perfectly suited for the job. Any scraped images that aren’t suitable (such as containing extra items) must be removed. This is the only part that requires review, however.
Since these image-to-image translations take paired images to train, I needed to find a way to generate line drawings from the scraped images. To start with, I used another GAN to generate its own lines from images. To do this, I had to first format the images correctly to be used by the GAN. I used Python Image Library (PIL) to change the format and size and convert the image to RGB, whilst adding extra space for the produced lines to be added to later.

Image ready for processing by GAN, with white space.
Whilst the use of this second GAN to generate lines created a level of variation, it turned out to be bad for the training of the second GAN, since the generated lines did not match the image closely enough to produce a well coloured/textured result. I eventually decided to use another means to create line drawings, but kept this creative edge detector to use later to experiment with variation.

A fish lineart drawn by the GAN – note the unusual shape and mix of texture.
To effectively train the colour/texturing GAN, I needed a clear set of line drawings that closely match the target image (the image scraped from Google). Firstly, I experimented with Python Image Library (PIL) as it has an inbuilt edge-detection tool. When applied to an image, it produces something like this:
PIL edge detect
To make the outcome a little closer to what the GAN needs, i tried inverting it:

Inverted PIL edge detect
Whilst this did work, it turned out to be inconsistent. When applied to the full dataset of over 1,000 images, some images turned out almost completely white whilst others turned almost completely black.

Inconsistencies of PIL edge detect.
This would have been even less effective for training than the second GAN method, so I decided to try something else.
Next I decided to try Canny Edge Detection in python. This proved to be much more effective than the GAN method in producing clear lines, and was much more consistent across a wide variety of images compared to using PIL edge detect.

Lines produced with Canny Edge Detection.
I then put this all together into a block of python code using PIL. It cycles through a folder of images, taking an image, resizing it and formatting it correctly, before duplicating it. The original image has white space added, whilst the copy is ‘converted’ to lines using canny edge detection. These lines are then pasted into the white space, and the file is given an appropriate name and saved into a new folder, ready to be used by the texturing/colouring GAN.
After these datasets were fully created, I started training on them using pix2pix tensorflow. Since the datasets were of high quality and not too large, the training process was quicker than the earlier examples and produced better results much faster. Once I had successfully trained the first realistic model, I began to experiment into breaking the typical training process and working out how to produce the most interesting results.
Training Epochs
Once the colouring/texturing GAN was fully trained with the accurate Canny Edge Detection line drawings, I revisited the lineart GAN as a means to create variation within outputs during the testing phases.
Dealing with Issues
When working with AI, it can take a lot of trial and error to get started. Often, things will crash without offering any kind of explanation, and it can take a fair amount of time to resolve these issues. Some of the most common errors are issues such as running out of memory or having the wrong version of a certain dependency. Since I am also working on windows with Cygwin, this can often cause other issues such as version discrepancies and errors.
If a GAN is not configured correctly, it will fail to even start training. In order to avoid errors such as these, it is important to first verify that all dependencies are working and are of the correct version. With the GPU-accelerated version, it is very important to make sure that Tensorflow is actually engaging the GPU instead of solely relying on the CPU – although this is not essential to make the model run, this is easy to overlook and will slow down the process considerably.
Next, it is essential to make sure that the hardware being used is capable of handling the GAN, and making modifications to allow it to work successfully. GANs can run into memory errors at any point during the process, but this is usually seen earlier rather than later. Whilst there is no “one-size-fits-all” solution to avoiding memory errors, modifying image sizes is generally a good start. It can take a lot of trial and error to find a point where it runs smoothly depending on the system being used. In the case of Edges to Shoes, the scale of the image must be a power of 2 to enable it to divide the image into equal integers (to work with the side-by-side matched pairs dataset format).
Avoiding a majority of errors during the training process is down to being observant of the training process – keeping an eye on the outputted images and the Generator/Discriminator losses to ensure they stay balanced. Since training can take a very long time, the last thing you want is to spend a week training a GAN that failed a few hours in! One way to do this is to monitor the process using Tensorboard:

Screenshot of Tensorboard during training process.
Typically, Generator and Discriminator loss should stay balanced, such as in the example above.

Output image shown during training process in Tensorboard.
Sometimes, a single bad image can cause a GAN to crash. This can be avoided by taking precautions to ensure that all images that are going to be used are correctly and uniformly formatted.
Planning the Presentation
Planning the presentation of the piece goes hand in hand with creating an ‘identity’ for the project. An acceptance of “Aida” as an artist relies very much on how it is perceived by those viewing it. This starts with the idea of making AI feel more human and less robot. Whilst this might seem pointless, even something as simple as giving the system a name helps with this.
Aida’s name is a reflection of Ada Lovelace, both in homage and in reflection of her famous quote, “The Analytical Engine has no pretensions whatever to originate anything. It can do whatever we know how to order it to perform”, as challenging this idea is at the core of Aida’s existence. It can also be an acronym, with AI standing for artificial intelligence.
Aida also has a logo, consisting of the name with the letters AI highlighted, where the I is a paintbrush. This highlights the creativity of the machine but also hints at the inner workings and inspirations behind it. This is paired with a running design theme, including consistent colours and fonts.
For my presentation, I created two large posters explaining how the system works, with flow charts and sample images. This was inspired by the works of Stephen Willats, but also inspired by the way information is typically presented in a museum. Since Aida is to be presented as an exhibition piece, it needs to have some form of explanation as to what it is or the experience falls flat. A lot of the work that goes into making GANs goes on behind the scenes, and the posters highlight how the system works in a simple way for those who are unfamiliar with AI.
The second part of my presentation includes the demonstration. Whilst this holds less importance than I had previously planned, I still consider it to be important as it allows user interactivity.
Building the Presentation Interactive Elements
This physical interactive part involved a difficult process – finding a way to present a typically very resource-heavy neural network in a neat and compact way (preferrably without having to demonstrate on a laptop, as this would look less professional and break the immersion). My first attempt was to train the least resource-heavy model possible and display it on a Raspberry Pi with a touch screen. This would allow users to interact with the piece in real time but also display premade outputs, and even animations during a “resting state”. This, however, did not work out; even during the considerably less taxing ‘testing’ phase (producing outcomes rather than learning), the amount of memory needed proved to be too much, with the Pi often overheating.
Since I still wanted to keep this interaction, I decided to try a different method. I used Bazel (a building software) to create a quantized version of my model. Quantization essentially “compresses” the model, and is typically used where AI is needed on low-resource and low-space systems such as mobile phones. Quantization does have a side effect of reducing the accuracy of the system, but in this case the compromise will have to be made or there would be no live demonstration at all!
Once again, response times from the model on the Raspberry Pi were very slow – even with a fully quantized model. The system was no longer running into memory errors, but instead would take upwards of an hour to produce a single output – nowhere near fast enough to use in an exhibition setting.
To fix this, I decided to take a slightly different approach. I continued using the quantized model, but instead of running it from the Raspberry Pi, I instead hosted it on my remote server, using tensorflow.js. Although responses aren’t instantaneous, they are considerably faster – particularly after the model has been run for the first time. This webpage can then be displayed fullscreen on the Raspberry Pi – allowing users to interact with it and collaborate with Aida.
Building the Presentation: Stand & Idle Animations
I made a short After Effects animation to play on the Raspberry Pi screen whilst it is idle. This animation is informative and shows some insight into how the system works, such as time lapses of training. When the screen is tapped, the animation stops playing and the system is ready for user interaction (live demo).
The animation contains footage of the Aida system running as well as a time-lapse of it training. The time lapse was made by making the model output images whilst it is training, and then stitching them together using VirtualDub. Because the images are not named correctly, I had to first write a short script to rename all the files to numbers, as well as delete any images that were not direct outputs of the system. The final time-lapse gives an insight into how the GAN improves its methods through training.

Raspberry Pi 3 in acrylic stand.
The Raspberry Pi is supported by a cut acrylic stand inside a box. This gives it stability, so users can touch the screen without risking it moving or falling.
